Archive for the ‘Tips and tricks’ Category

How long would it take to recover your password?

Friday, January 21st, 2011

If you've used USBCrypt to encrypt your drives, you have probably wondered, how difficult would it be for someone to discover the correct password by just trying all possible character combinations until one of them unlocks the encrypted drive?

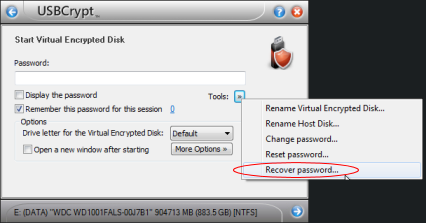
It's easy to find an answer to such a question, using the built-in Recover Password command of USBCrypt software. It's easy to find it: just try starting an encrypted drive, as usual, but instead of entering the password, click on the Tools button and select the Recover Password item on the menu:

The Recover Password command of USBCrypt

If you select the Recover Password command from the menu, the next screen will ask you to choose the character set to use for trying the passwords:

The settings for the Recover Password command of USBCrypt

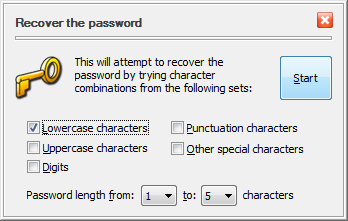
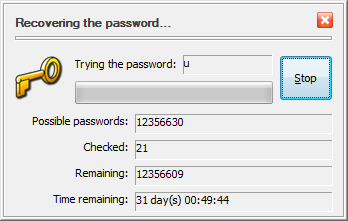
You can select the minimum and maximum length of the passwords to try, and also choose between the lower-case or upper-case characters, digits, special characters, or any combination of them. When you press the Start button, USBCrypt starts trying the passwords from the character set you've selected, in turn, until it finds one that unlocks the encrypted drive. While it's doing that, you can see the progress in a separate window, that also shows the estimated time to complete the enumeration of all possible passwords from the character set you selected:

The progress of the Recover Password command of USBCrypt

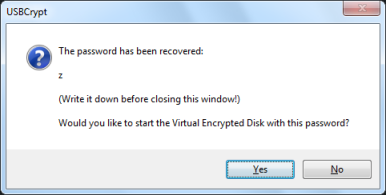
If your password is short and simple, it can be discovered rather quickly:

The successful result of the Recover Password command of USBCrypt

What about the more complex passwords? The time to go through them all increases rapidly with the length of the passwords and their complexity. Here are a few numbers, obtained on computer with a mid-range (as of the time of this writing) Intel i5-650 CPU:

Characters/Maximum lengthUp to 3Up to 5Up to 7
Lowercase30 minutes15 days28 years
Lowercase + Uppercase4 hours1 year35 hundred years
Lowercase + Uppercase + digits7 hours3 years12 thousand years
Lowercase + Uppercase + digits + all special characters1 day 26 years240 thousand years

(Your numbers may be different if your computer has a different processor.)

The table above should give you a pretty good idea about the length and complexity of the password to use to keep your password safe from brute forcing. On the other hand, it can also serve as a strong reminder to take care to remember your password, because if you forget it, it may be practically impossible to recover it (unless you have created a spare key file with USBCrypt, of course.

Choosing a good encryption password

Sunday, April 18th, 2010

Selecting a good encryption password is hard. On the one hand, it should be complex and non-obvious enough for others not to easily guess it. Yet, it should be sufficiently simple for you to remember and avoid the temptation to write it down. Besides, there are quite a few misconceptions around that make choosing a good password rather confusing.

For example, whenever you are prompted to set up a password, the system usually informs you about the minimum length of the password that you should select. Such a requirement may create the impression that the longer the password, the more secure it is. This is not always true! It would be true if you were choosing a random combination of characters for the password, such as “dkoirnfyut”, or “alokifjnwl”, or whatever other combination you could produce by typing random keys on the keyboard. The problem is, however, that more likely than not, you are selecting an existing word (or, a word from a dictionary), like “apple” or “orange” for the password. In such a case, if someone would try the dictionary attack on your encrypted data, it would make virtually no difference whether the word is short or long. It takes the same amount of computer time (give or take a few nanoseconds) to try “tea” or “antidisestablishmentarianism” as the password.

By the way, what is the strength of a dictionary word as the password, you might be wondering? Let’s assume that you’ve selected a random word from a dictionary that has a million words. Considering that 1 million is roughly the same as 220, it means that the strength of such a password is only about 20 bits! It does not matter if the software uses 128- or 256-bit encryption key, because if your password can be recovered in 220 attempts, the effective security of your encryption gets reduced to 20 bits, simply by the fact that you’ve chosen the password from the dictionary.

That’s why most systems insist that your password should contain a mixture of uppercase and lowercase letters, numbers, and special characters: such additions make the dictionary attacks much harder. However, they make remembering the passwords harder, too. What should you do?

There are several methods available for creating complex passwords that are easier to remember. One of them is by creating artificial passphrases (rather than passwords), by combining random words from a dictionary. Take a dictionary book, open it on a random page, and write down a random word you like on that page. Open the dictionary on another page, write down another word. Repeat several times, then move the words around to create a phrase. (The phrase does not have to make sense!). For example, I just tried it and came up with: “Antisocial Pomegranate holds back Blue Herring” (Sounds fun, doesn’t it?) If you can remember such a phrase (including the capitalization of the words), you’ve got yourself a rather strong passphrase.

Another method that’s often recommended is the “first letters of a phrase” technique. Think of a phrase that contains several words, that you could remember. For example, it could be a line from your favorite Beatles song, like “Desmond has a barrow in the market place, Molly is the singer in a band.” Take the first letter of each word, and combine them together: Dhabitmp,Mitsiab. Note that we’ve preserved the capitalization of the letters, and also kept the comma in the middle. The resultant password is almost as strong as a random combination of 17 characters, yet you should be able to remember it easily, as long as you remember the original phrase.

Yet another approach is to create complex and long passwords for each situation, and use some password management software to keep track of them, such as KeePass. When using a software password manager, you only have to remember the master password. Of course, the inconvenience of this method is that you always have to use the password manager to recall the passwords for you, but if you need to have many strong passwords, that’s a small price to pay for the security. And, of course, don’t forget to backup your password database, because if you lose it, you lose them all!

Selecting encrypted file system

Tuesday, March 23rd, 2010

When you encrypt a drive with USBCrypt, on the Choose size page of the wizard you can specify not only the desired size of the Virtual Encrypted Disk to create, but you can also select the desired file system for it:

Selecting a file system format for the encrypted drive

Let’s discuss these options in more detail. First of all, in this example there are two choices for the FAT format, one listed as Default (FAT) and another one as just FAT, what is the difference between the two, you might be wondering? The Default choice instructs USBCrypt to select the same file system for the Virtual Encrypted Disk as that of the host drive. As you can see in this case, the host drive is formatted with FAT32 (as shown at the bottom of the USBCrypt window). Therefore, the default choice of the file system for the Virtual Encrypted Disk is FAT, too. If the next drive you are going to encrypt with USBCrypt happens to have the NTFS file system, then the Default option would format the Virtual Encrypted Disk with NTFS file system, too.

If that’s how you want USBCrypt to select the file system for you, then choose the Default option. If, however, you prefer one of the available file systems, and want all Virtual Encrypted Disks to be formatted with it, then select that item in the list (rather than Default). For example, if you select the FAT option, then all Virtual Encrypted Disks you create in the future will be formatted with the FAT file system, no matter how the host drive is formatted. (Of course, you can change your selection at any time!).

Which file system is “better”, FAT or NTFS? The correct answer is: it depends. The FAT format is more suitable for the smaller drives (say, smaller than 1GB or so). The FAT system is much simpler than NTFS and has less overhead. If all you need the encrypted drive for is to keep your documents and spreadsheets, then FAT would suit you just fine.

However, if you intend to store very large files on it (4GB or larger, such as the video files), then you should select the NTFS system, because FAT system cannot store such large files. (It was designed such a long time ago that it was difficult to imagine we would ever need to have files larger than 4GB!). NTFS offers several other options over FAT, such as the built-in file-based compression and access control (although you don’t really need it, since USBCrypt already provides security for all files within the Virtual Encrypted Disk, whether it is formatted with NTFS or FAT).

What about the last choice in the list, None? If you select it, then USBCrypt will create the Virtual Encrypted Disk without any file system inside at all. In such a case, you will not be able to put any files into the Virtual Encrypted disk until you format it by yourself (Windows Explorer should prompt you to format the drive when you attempt to open it for the first time). You may want to select this option if you want to use a formatting option other than the one built-in into Windows that USBCrypt uses.

Happy formatting!

Using encrypted drives on computers without USBCrypt installed

Friday, March 5th, 2010

Can you use a drive encrypted with USBCrypt on other computers that don’t have USBCrypt software installed on them? Like the computers at your local library, or at your friend’s house? Yes, you can: when you encrypt a drive with USBCrypt, it automaticvally puts a portable version of USBCrypt soiftware on the drive as well, to allow you to use the drive with other computers. All you need to do is attach the drive to the computer:

Windows usually prompts you to open the drive when you attach it

(If you don’t see such a prompt, use the Start – Computer menu to open your drive). Then double-click on USBCrypt (or USBCrypt.exe) to run it off the drive:

Double-click on USBCrypt to run it off the encrypted drive

OK, there is one catch: if there is no USBCrypt software installed on this computer, then in order to run USBCrypt off the attached encrypted drive the administrator of the computer must give his or her permission for that:

The admininstrator must give the permission to run USBCrypt off the attached drive

This message is not entirely accurate: USBCrypt does not want to make changes to the computer, all it wants is load the encryption driver. Anyway, come to think of it, this message is a good thing: after all, if it were your computer, you wouldn’t want your friends to run arbitrary software on it without your permission, would you? Go ahead, tell the owner of the computer what USBCrypt is all about, and if you ask nicely, the owner should let you continue.

Note that the admininstrator’s consent must be obtained only once per Windows session: the consent remains in effect even if you detach the drive and insert it again: there should be no second prompt asking for the admininstrator’s password (we don’t want to annoy the administrators with our little questions, do we?) Only if the computer is restarted a new admininstrator’s permission must be obtained again.

After that, you can work with your encrypted drive as usual: you can enter your password and start the Virtual Encrypted Disk, stop it, rename it, etc. Note, however, that one cannot encrypt a new drive by running USBCrypt off another encrypted drive as described above. For that, USBCrypt must be installed on the computer the usual way. Happy encrypting!

Suppressing the Low Disk Space balloons

Saturday, December 12th, 2009

If you’ve used USBCrypt to encrypt a removable USB drive and selected to encrypt all available disk space, then you’ve no doubt noticed the “Low Disk Space” balloon in the taskbar:

Low Disk Space balloon

Low Disk Space balloon

It may not appear immediately, it may take a few minutes after you log in to Windows to become visible. Because it has the USBCrypt icon, the balloon looks like it’s displayed by USBCrypt, but in fact it is displayed by Windows itself (it just grabs the icon from the autorun.inf file of the disk). And it’s not related to the disks encrypted with USBCrypt specifically: the balloon would be displayed for other disks as well, if you fill them up to their capacity.

The designers of Windows have probably had good intentions when they added this balloon to Windows, it probably is nice to get an advance warning before a disk becomes full. However, if this specific case, the warning serves no useful purpose:  after all, when you told USBCrypt to use all available space to host the encrypted data, the disk becomes filled up by design, and you should now be concerned (and warned) about the Virtual Encrypted Disk being filled up, instead of the host disk.

After seeing the balloon a few times, you’ve probably wondered if it’s possible to suppress it (even Microsoft itself calls this pop up irritating!).  It would be nice if Microsoft would put in a bit extra effort and allowed the user to stop the balloon from appearing for the specific disks, such as the USBCrypt host disks, which are often expected to be filled up by design. Unfortunately, that’s not the case: you cannot suppress the balloon for some disks and leave it for others, it’s all or nothing.

To suppress all Low Disk Space balloons, for all disks, you can follow the steps described in the Microsoft support article. Keep in mind, however, that this article contains an error (at least it did at the time of this writing): it instructs you to name the DWORD value “NoLowDiscSpaceChecks”, while the correct name should be  “NoLowDiskSpaceChecks” (without the quotes).

Or, you can download and import this registry script: NoLowDiskSpace, that would create the required registry value for you.

To use this script, save the file onto your hard disk (by right-clicking on the link and choosing Save Link As or Save Target As or a similar command). Change the extension of the saved file from .txt to .reg (that is, rename it to NoLowDiskSpace.reg. We made it a text file because some anti-virus programs block attempts to download .reg files). Then double-click on NoLowDiskSpace.reg file that you have saved to your hard disk, confirm that you want to add it into the registry, and when it’s done, restart the computer. You should not see the Low Disk Space balloons after that.

If, however, one day you decide that you miss that balloon, you can use another script to restore it back: YesLowDiskSpace. (Use the same procedure to  apply it).